I submit that TechSmith's Camtasia is the industry standard for educators. It is very reasonably priced, and provides a complete solution. Their lightweight version, Jing, is great for quick screencasting. I use Screencast-o-Matic occasionally, as it is quicker (but offers less flexibility). It's a moot point though, on a Chromebook, as none of those tools will work (they require either installation or Java). It's also a moot point if you just prefer to live in the cloud. As tools for cloud productivity increase, we've been holding out for the silver bullet to screencasting. Technically, it's been around for a while in the form of Google Hangouts and screen sharing, but the process is cumbersome.
A few weeks ago, Richard Byrne blogged about the three ways to screencast in a recent post. I like a lot of what he said. He reviews the pros and cons of different screencasting solutions, but I wanted to dive a bit deeper into what I believe to be one of the most seamless solutions.
ScreenCastify is an extension in Chrome, and it's pretty slick. It works out-of-the-box, is ridiculously easy to use, integrates with Google Drive, and is free! I'm not saying I wouldn't ever use Camtasia, Jing, or the like. I'm saying that there is a trade-off. Heavy weight software like Camtasia affords you more options (like professional editing, for example). ScreenCastify does not. I don't think that's a bad thing - it's just a different tool. For professional grade tutorials, I'd probably use Camtasia. But for most of what I do, I think ScreenCastify is perfect.
To get started, go to the Chrome web store and search for ScreenCastify (or click here).
 |
| A few clicks away from awesomeness. |
Install it. It's harmless.
 |
| Loving their logo. |
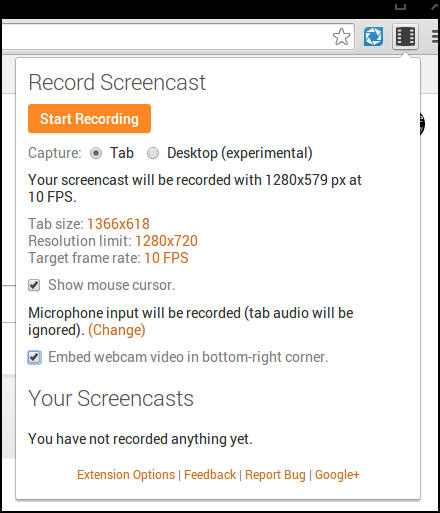
When you click the icon in the Extension Bar in Chrome, a menu will drop down. Here's the important part - the default options really should be tweaked to optimize productivity.
 |
| The default options should be tweaked. A lot. |
Things to consider:
- This menu allows you record the entire desktop (instead of just the current tab) which is a good option if you plan on using multiple tabs (although this is experimental right now and on a traditional computer - not a Chromebook - requires a modification in your settings for Chrome).
- You should probably change the "Target frame rate". Ten FPS (frames per second) is very laggy. You can up it to 25 (which is pretty dang good).
- You can also elect to record the cursor (which is the default, but is only an option when recording one tab - not the whole desktop).
- Consider if you want the audio to be captured from the tab that is being recorded or from the microphone.
- Also, decide if you want to embed the webcam video in the bottom-right corner or not (by default, this isn't selected). The Instructional Designer in me endorses this practice, as it humanizes the lesson that is being captured.
 |
| See all of those extensions? That's what PRODUCTIVITY looks like! |
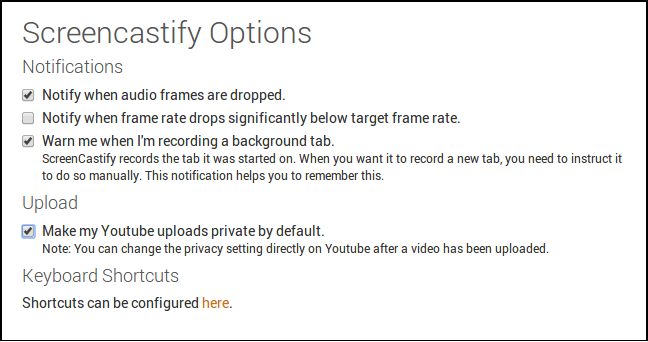
By default, ScreenCastify will publish any video to your YouTube account with a "Public" setting. I recommend changing the setting to "Private". It can be changed later if you want to share it (I usually choose "Unlisted" (which is the same as sharing files in Google Drive by "Link only"), and then embed the video where I want it to be seen). The problem is that if a video is published on YouTube and it isn't private, subscribers will get a notification (which is not desirable if you aren't quite done with the video, or if the content isn't aligned with your normal video posting habits).
 |
| I know how you like options, so I have options for your options |
That's it. You're ready to go. Whenever you want to capture the screen, just click the ScreenCastify icon in the Extension Bar. Hit the "Start Recording" button, and make a video!
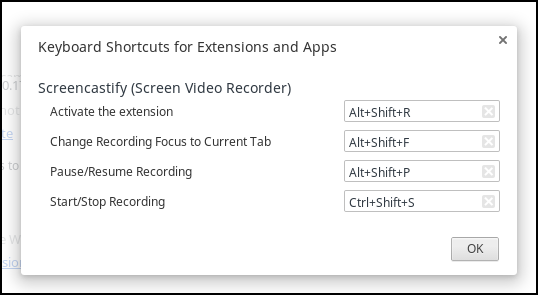
I find it easier to use the keyboard shortcuts, as they eliminate the need to navigate menus with your cursor when recording. Access this menu by clicking on the "Extension Options" link on the ScreenCastify menu, or by managing the extensions via Chrome.
 |
| Control + Shift + S = ScreenCastifying like a BOSS. |
A few tips for screencasting:
- If you plan to type while making the video, be aware that most embedded microphones will pick up the clack of the keys. You may be better off using an external microphone that is close to your mouth, or a quiet keyboard. I like to use a USB keyboard and move it as far away from my microphone as possible.
- Experiment first. Don't try to do a six or seven minute clip right off the bat. Get used to the tools. Watch the videos you make. Learn from those experiences.
- With photos, it's easy to correct a bad photo with software. Audio is a different story. If you don't start with good audio, you will not be able to enhance it easily. I'd recommend investing in a good microphone if you intend to do a lot of screencasts. You might even consider a "pop filter" to help reduce the "puh" noises from words with a "p" in them.
- It's okay to make mistakes. It's human. I think that making small jokes, clicking on the wrong thing once or twice is okay. People trip over words in a face-to-face class, so why should it be different for an online video? Videos that have personality and shy away from the sterile environment of a robotic presentation are engaging. Embrace that!
- As mentioned earlier, think about including your face in the lower corner (captured from a webcam) when making the video. This personal touch has been proven to help students feel like they are part of an individualized experience. Just be aware that you won't see the rectangle in the lower corner as you are recording, so be aware that content on the screen in that region may be obscured by the video of your face.
- I also mentioned this earlier - use shortcuts! It will help keep your presentation on point (you won't be flinging the cursor all over the place trying to click on the start/stop functions). You can also pause the recording with the keyboard shortcuts.
- If you are using a Chromebook and recording the whole desktop, hide the Shelf (analogous to the Taskbar in Windows or the Dock on a Mac). Otherwise, if you have the video stream from your webcam included, it will look odd as the webcam rectangle is a bit transparent and will be distracting as it goes over both the screen and the Shelf.
- Have a script prepared. Or at the very least, have an outline. If you don't know exactly what to say, it will be evident. You don't want to appear unprofessional.
- Film with good lighting. For me, it's easier to get good lighting during the day. But I can make do at night in a well lit room. I usually use the onboard camera to check the framing before I start recording.
- Be conservative with hand gestures in the webcam. It can be distracting. One unfortunate byproduct is that webcams can sometimes distort scale, so in the video I demo here, it looks like I have freakishly large hands (admittedly, they are large - just not freakishly over sized).
That's it! You can go out and record your own screencast now. Don't be afraid. Poke. Prod. Figure it out. But know that Screencastify gives you immediate access to a cloud based solution for screencasting. Go out and have fun.
If you have any questions or comments, make a screencast that clearly articulates your concerns, and send me the link!


Screencastify do not stand behind their product. My experience is that it's terrible software. I spent 4+ hours changing settings and trying to get the right mic configuration to no avail. It would only use the external mic to record video instead of the internal sound recording. I emailed support at least 15 times and eventually they made me feel like it was my problem or my fault and that this was probably the first example of such a failure they had ever ever ever experienced. And then when i said i could no longer justify spending more time trying all the different options to fix the problem the response was "I cannot process your refund since we have a no-refund policy which is detailed in our terms. I'm afraid you'll get the same response from anyone else in the company. ". LESSON: anyone who reverts immediately to say that the refusal to do the right thing and respond to a genuine complaint is buried in "the terms and conditions" is a BIG red flag. Surely if you have a good product and good support but cannot solve the exceptional occasion when some technical thing causes a failure to use the product then you would be more than happy to refund that customers purchase. But in this case the immediate response was a denial. All that says is that the problem probably isnt unique and that they certainly do not stand behind their product.
ReplyDelete